Remember the Barista Cup? There’s a new updated version that’s even better than before—and I’ve got one to show you.
Follow me on BlogLovin’
Hello, again, Dear Readers:
I don’t know about you, but we’re having a transitional period of dropping temperatures. It’s warm during the day but chilly overnight. This morning it was 50 degrees!
This beautiful flower sprouts on our neighbor’s lawn when fall is imminent:

The Red Spider Lily on our neighbor’s lawn
Called The Red Spider Lily, aka, “Surprise Lily,” or Lycoris radiata (the scientific name), this easy-to-grow flower blooms every year about this time, signaling the change in season. They can be cultivated, but our neighbor didn’t do that, they just show up every year. Of course, I asked permission to get this picture, because I didn’t want our neighbor to think I was totally bonkers prowling around her front lawn. However, she was about to cut the last of them down with her lawn mower anyway, so I had to do it quickly.
Southern Fall
We’re not ready for boots and parkas yet, but soon we’ll be wearing longer sleeve shirts and putting the shorts away for the season. Unless you’re in the South—then don’t put your shorts away, because two weeks later you might need them again in between weather fronts.
It’s also getting into the season where many people drink more coffee. I’m a year-round coffee (and tea) drinker like many people. But when the temperatures decrease, you might be drinking a little more of the hot beverages. In about a month I’ll be looking for some chocolate almond milk for my favorite hot chocolate.
And what better way to start making more coffee than with a new coffee maker in a cup? (Note: I gave my BFF the week off for this one.)
Remember The Barista Cup?
Back in 2019, I was gifted a new Barista Cup from the company that makes them after reading about it on Nick Usborne’s Coffee Detective blog. Nick is a coffee aficionado, and he’s been doing this coffee blog for a good 20 years now. He has tried any number of pieces of coffee brewing equipment. I figured he knew what he was talking about, so I mentioned here it initially. When someone in their marketing department found me, they sent one for me to try, and. . .no complaints.

The original Barista Cup
So, the Barista Cup is a different way of doing things sustainably, using less coffee, and no non-recyclable plastic pods, leading to less waste. This cup brews your favorite coffee (or tea) instantly with just the addition of hot water.
In the original blog post I wrote in 2019, I mentioned that you need to be careful when cleaning the grounds out to avoid losing the gaskets. Guess what? Last fall, I lost one of the gaskets, the one under the top. It had to have happened when I was either washing it or emptying the grounds in the trash. Plus, it’s a black gasket, and if I lost it anywhere, it’ll be almost impossible to find in this house, especially if a large dog didn’t find it first.
Gaskets Make The World Go Round
Anything that involves keeping liquid in or out of something is going to involve a gasket. It’s probably made of rubber but could be silicone or something similar.
A gasket has a singular purpose, to prevent something leaking into or out of anything. Gaskets are used in a variety of everyday things from a coffee cup to the doors and windows of your home. If it leaks, replace it, or face the wrath of anything from slightly dripping to the full force of Mother Nature.
When I lost the cap gasket forever on the Barista Cup, I went looking for a replacement.
The Search
Something I discovered that was extremely helpful was that Amazon has countless types and sizes of gaskets (and other replacement parts) for nearly anything that takes one. Just measure what you need and order, even if it takes a while to find. I discovered this when I was trying to replace gaskets on my Starbucks cold cups, and I got some that fit even better than the originals. When I needed a new gasket for the countertop dishwasher after Hurricane Ida, I found one on Amazon for about $15, and just needed to trim it to fit. (That dishwasher was recently replaced by a new one when the original finally gave up the ghost.)
So, it stood to reason that I would be able to find a replacement gasket on Amazon for the Barista Cup. At least, that’s what I thought. I measured and looked and measured and looked, and I didn’t care the about the color. I just needed something to fit the cup. Unfortunately, I didn’t find one, and so I didn’t know what else to do. Maybe I didn’t look far enough. After all, without that gasket, coffee drips down the front of my T-shirt. This was not good. I liked that cup but hated the coffee stains.
Instagram: Sliding Into The DMs
Many companies know that social media is integral to connecting with customers. The Barista Cup folks are no different. They don’t post daily like the Aldi people do, but they are receptive to connecting with fans. And they do answer their direct messages (DMs).
So last December (I know, I’m late) I sent them a DM on Instagram about replacing the cup’s upper gasket. The response was that they would send me a new cup! I didn’t ask the name of the person on the other end; I was kind of afraid to. They did ask what color I would like, and for the mailing address so they could ship it to me, which I provided. I requested Navy, and the box arrived a few days later via UPS.

They were very nice to send this.
Oh, BOY!!!
I was so happy when it arrived that I made a live unboxing video on Instagram. (It’s still there, too, but I won’t bore you with it.) You can tell I wasn’t ready. . .I looked awful! Not doing that again without makeup, and I should have bothered learning to use filters. But I wanted to make sure that the company got my thanks, and I could show off the cup properly.
I can’t believe I talked for 20 minutes. I don’t know who ever watched the video, or saw me live, but I did tag Barista Cup, Nick Usborne, and his blog, Coffee Detective, as well as give a link to my original blog post in the comments.
What’s In The Box
If you’re not interested in watching the video (understandably) here’s what comes in the box.
Well, the new Barista Cup, of course, but also some coffee and tea packets as well, along with instructions for use. The English Breakfast tea was the first one I tried, since it’s my favorite.

It came with several samples perfectly matched for the Barista Cup
I also sampled the Peru and Guatemalan coffee blends, which were also delicious.

This was delicious.
I wanted to wait until I finished taking pictures. . .but I couldn’t wait, so I kept the packets. Also included are packets of their decaf coffee, green tea, and peppermint.
The box is elegant as well as sturdy, so it’s ready for gift giving, whether someone else or yourself, and suitable for storing your cup.
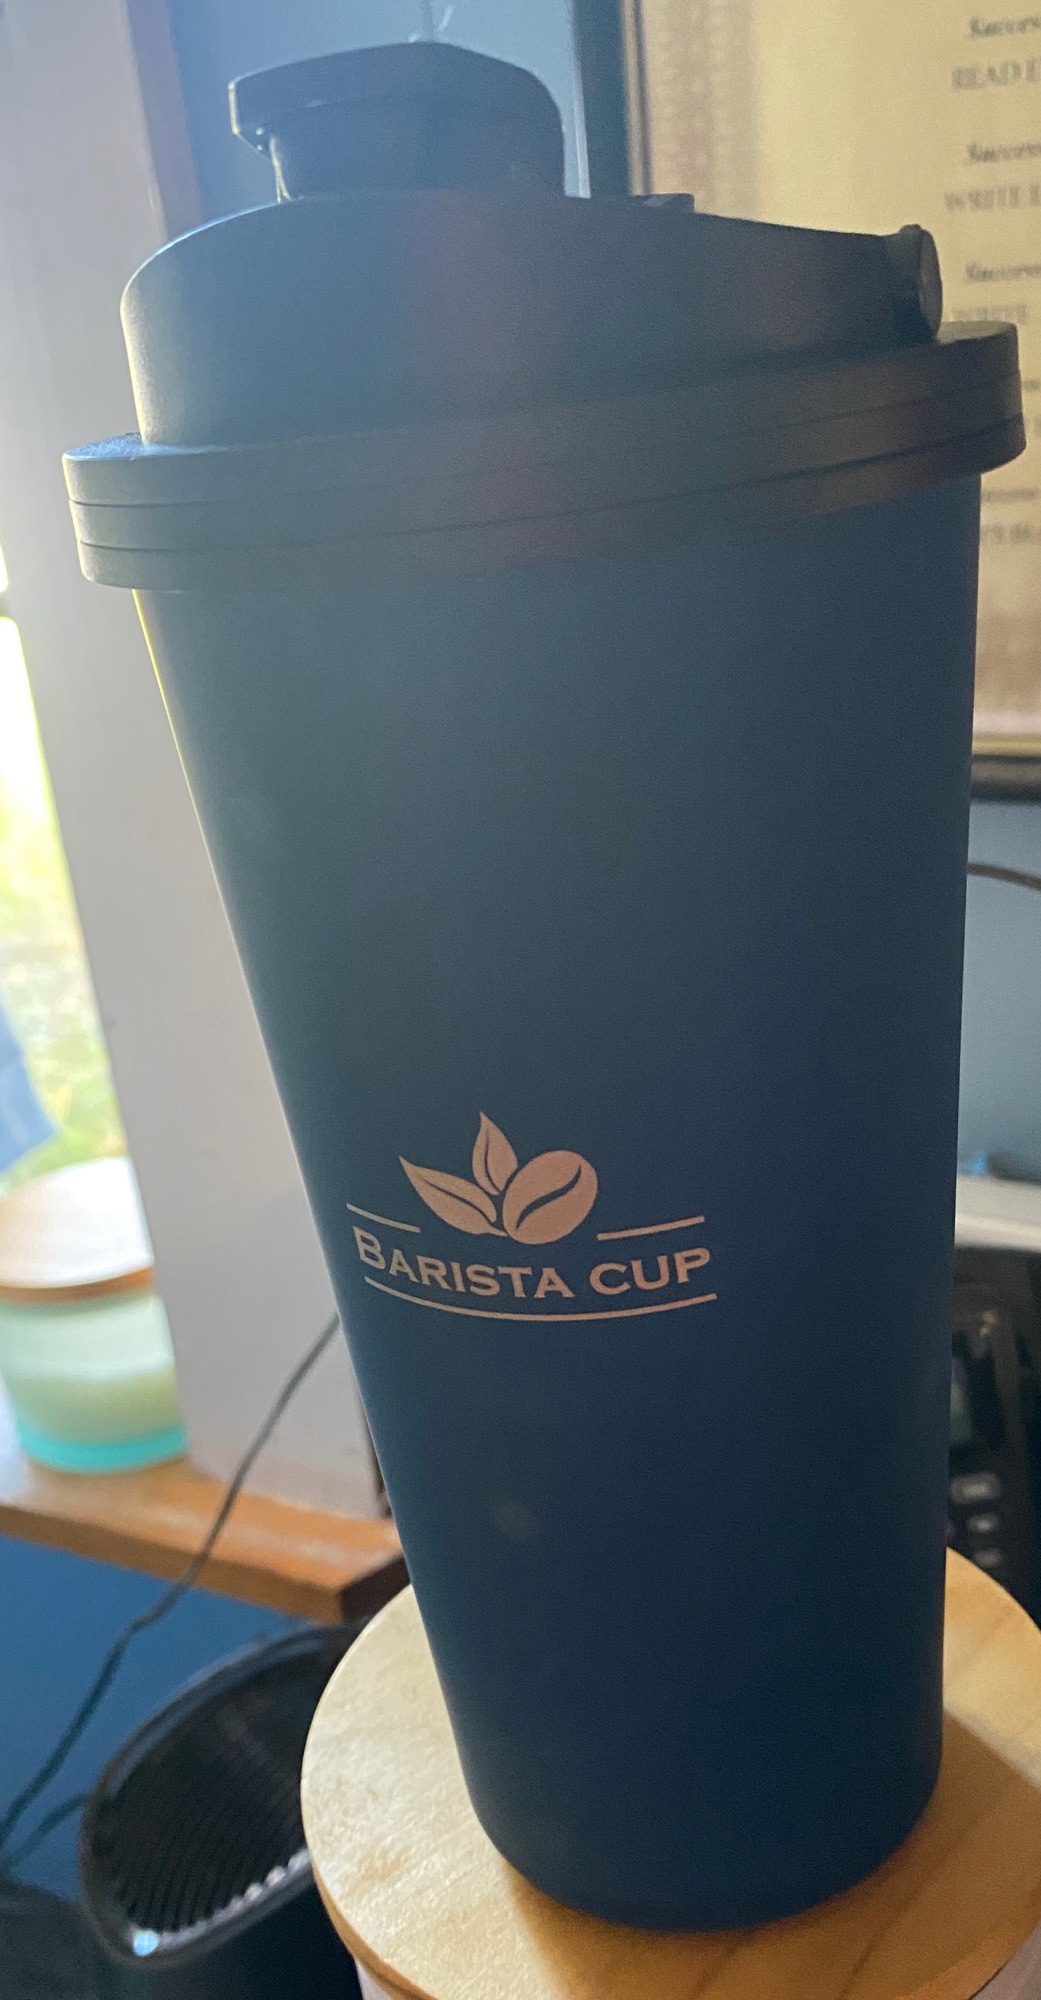
Learning To Use Barista Cup 2.0
So, there are a few changes from the original cup while keeping the same basic principle. First, the cup is all metal except for the lid, and well insulated.
Instead of a three-part cup, this “2.0 version” has a one-piece cup, a redesigned cap, and a metal insert instead of a removable bottom. This makes removing the grounds easier.

The insert that keeps the grounds separated after brewing
When you’re finished with your coffee, remove the top, then the metal insert, and remove the grounds from the bottom of the cup. Any drinkable coffee left can be strained into another cup if you like. (Watch out for the gaskets!)
The cap also has a carrying handle and two gaskets—one inside, right under the cap and around the screw threads, and the second, a tiny gasket in the flip top.
In place of the “rubber tire” sleeve on the exterior, the entire outer cup has non-slip coating. The Barista Cup is now easier to hold and will stay in place if you tote it with you in the pocket of a messenger bag. And insulation means your fingers don’t get hot, either.

Sleek and stylish
Just like the original, you pour the water first, then add coffee or tea and anything else (milk, sugar, etc.) Stir, put the cap on, and enjoy. No kidding, that’s it. This new design allows the coffee or tea grounds to filter down to the bottom of the cup via the hole in the metal insert. The grounds don’t sit too long in the coffee and don’t turn the coffee bitter from “over-brewing.” There’s a gasket around the outside of the metal insert to keep them separated once the grounds migrate south.
This short YouTube video explains the process.
The Filter and the Max Fill Line
One caveat: there’s a valid reason not to overfill the cup, and I found it. Obey that “max fill” line.
The cap is actually in two parts: the screw-on cover and the snap-on filter underneath.

The top is a unique design that filters out grounds when you drink it.
There’s about an inch between the bottom of the filter and the top of the cap.

Take this apart when you wash it–but don’t lose the screen!
If you put too much coffee in the cup, there’s a good chance the filter will fall downward into the cup while you’re trying to drink, inhibiting the flow. If you tip the cup too far up, you could get more hot coffee than you intended if the filter tips sideways. Because I know this happens, I’m careful. But many times, I have had to carefully remove the cap, remove the filter screen from the inside and replace it on the bottom a few times. And it’s because I went past the “max fill” indicator.
Toting Coffee Anywhere
The little carry handle on the cap means you can carry it with you or hang it on a backpack or messenger bag. You may also be able to carry it inside of a bag if there’s a sleeve that prevents it from sloshing around and spilling, even though there are good gaskets in place to help prevent leakage. I’d advise against having it inside a bag, though.
What if you’re at the office or at someone’s house, you want another cup, and there’s coffee already made? Use the cup without the insert—just don’t lose the insert. Remove the grounds, rinse it and the insert, dry the insert and put it in your bag so you can drink from the big cup. And field the subtle looks of envy from others as you sip java from such a sophisticated vessel. Because it just looks so good.
The Barista Cup keeps drinks hot for 4 hours and cold for 6 hours. In my experience it might be a bit longer, because I have had to put additional milk in mine when it was too hot for a long time.
Hand Wash Only
With the non-slip coating and metal innards, handwashing is highly recommended. And there’s another caveat I need to mention: separate the cap parts and wash individually before putting it back together and onto the cup.
I didn’t realize at first that the filter screen came off the bottom of the cap.
I was rinsing the cap well, or so I thought. When your dishwashing liquid has a “new, fresh scent” and you can taste it. . .that’s when I realized that the cap had two parts. There is about an inch of air space where it can hold the soap and the scent. Now I wash them separately and let them air dry. No more “new fresh scent” tastes in the coffee.
Again, I speak from experience on this one.
Barista Cup’s Website
The company has streamlined their offerings. Instead of a large variety of designs, there is one model, the Rockies Edition, that comes in three colors. For the office or events, you can also buy their disposable Barista Cups by the case.
I’ll bet you’re wondering what this cup costs. Let me tell you right up front: the reusable Rockies Edition cup is $50. It’s also well-made and built to last. Takes a little know-how to use, but it’s not difficult. However, it’s probably not something you’d buy for young kids or grandkids. It’s more for an adult who appreciates a good cuppa. The Barista Cup is a very grown-up gift.
Although you can make any kind of coffee you like in the cup, Barista Cup also has its own coffees, available in single packets. You can buy both the Guatemalan Blend and the Decaf Blend, but only in cases of 280 packets. Like the disposable cups, these are more for offices and events. At the bottom of the website, there is an email address for wholesale and marketing inquiries. The company also visits trade shows on occasion, but none have been close enough for me to attend.
Swift Brew
Their Swift Brew is profiled on this page, but I don’t see it for sale. This might be just for business. On their Instagram, there is one post from last year that talks about how their coffee is available if you’re taking the TransPennine Express from Liverpool to Edinburgh. It makes me wonder if the coffee is embedded in the cup for quick brewing, but that’s just my guess. I have sent an email to the company and asked about Swift Brew but have not received a response. They’re busy getting coffee and cups to their customers.
There are a few coffee-related articles on this page of their website, too.
Before you go looking, these cups are not available on Amazon. I checked. Far as I know, they’re only available on The Barista Cup website.
Want something to go with that morning coffee? I’ve got just the thing.
A Quick Breakfast—Banana Oat Waffles
I have so many recipes from Instagram and Pinterest saved everywhere, including on my phone. Over the weekend, this one burbled up from thousands of pet pictures.

Easy to make and gluten free!
Unfortunately, I can’t seem to find the original account that posted this recipe. Dash only picked it up and shared it in its Stories one day.
I asked James if he’d like to try some this weekend, and he said yes. Since I was going to Aldi anyway, I decided to pick up one banana and try it out. But oat flour is not readily available locally anymore after Winn-Dixie closed last year. So, I recently started making oat flour by utilizing my super-powerful food processor to grind up the raw oatmeal myself and make some. Once I haul that 28-pound motor unit onto the counter, it makes quick work of the dry oatmeal. (Cuisinart no longer makes the one I have.) And it works just fine for what I do with the flour.
Making Waffles
Because I’d managed to get a ripe banana, I used the meat masher to quickly mash up the flesh. Since there were no directions, I just mixed everything in with the banana while I heated up my Dash waffle stick maker:

It was easy!
And made these while he was at the stove:

A nice addition to a weekend breakfast
We only had two waffle sticks each with breakfast, and I poured syrup into small pinch bowls for us to dip them in—regular syrup for James, sugar-free for me. Mind you, we also had to fight off the dogs while we ate, but that’s a regular thing for us now. It works to have two of the dogs outside and Buddy, aka, Broccoli Stirfry, inside with us until we’re finished. Fast, easy, and even James liked them, so we’ll probably have them more often. (Of course two dogs unintentionally each got half of one this morning, too.) There are a few left in the fridge, and I would just need another banana to make more.
Here’s the recipe if you want to print one.
- 1 Ripe banana
- 1 egg, beaten
- 1 tbsp Avocado oil Can also use melted coconut oil
- ½ tsp vanilla
- ½ tsp cinnamon
- ⅔ cup Almond milk unsweetened recommended
- 1 cup oat flour
Heat your waffle maker. Using a meat masher or fork, mash the banana in the bottom of the mixing bowl.
Mix the remaining ingredients in with the mashed banana and ensure it is smooth and mixed well
Spray heated waffle maker with nonstick spray, and pour just enough of the mixture onto the bottom plate so as not to spill out. Replace the top and cook until done.
Repeat with remaining waffle batter until all the mixture is used.
Keep waffles warm in a toaster or microwave oven. Any leftovers can be stored in the fridge and reheated in the microwave, toaster oven or air fryer.
Until Next Time
The holidays are coming! If there’s someone on your list who a) loves coffee, b) hard to buy for, or c) needs one, The Barista Cup may be just the thing. And it’s not a bad thing if you buy one for yourself.
I’m looking forward to next week’s topic. . .whatever it will be. Me and my BFF will be brainstorming soon to pick the next blog.
Enjoy!