It’s the beautiful wedding of Rafael and Carmen Cruz Rodriguez in a rustic, peaceful setting in Magnolia, Texas, just north of Katy. Finally, the blog you’ve been waiting for. Me too. TL:DR: Everything was just lovely, and of course, the food was delicious. Take a ride with us to The Springs of Magnolia.
Follow me on Bloglovin’
Hi Again, Dear Readers:
So, I’ve been procrastinating for over a year with these blog posts and it’s time to just get it done. I know, there have been been a couple of other occasions where I put it off before. But seeing as the married couple just celebrated their first wedding anniversary, well, here it is.
Going to the Chapel of Love
Rafael And Carmen Had a beautiful wedding on Saturday, November 5th, 2022 at a place called the Springs in Magnolia. A year before, Raf texted me the date and they later sent out a “save the date” card to their guests.

This was a big fridge magnet, and I framed it later.
The pictures are perfect. But one thing it does not show is that Carmen is at least a foot and a half shorter than Rafael! That’s OK. If you didn’t know, you wouldn’t see it in the engagement pictures. But it’s obvious in the wedding pictures, as you’ll see.
Later on, the wedding invitation arrived.

Yup, framed that one too after the wedding.
Rafael and Carmen did the design work themselves. Nice work, well done. The design was in full view throughout the reception.
Travel Arrangements to Houston
And then BF and I made our plans to attend. We found a suitable pet sitter on Rover.com. She was a nice young lady who took care of our two dogs and two cats for the duration of our trip. Once we arranged that, I made our hotel reservations.
Rafael suggested staying in Katy because it was the easiest and best way to get to the wedding. I used Booking.com, and it was easy. For the wedding, I booked us into the Katy Hampton Inn, right off I-10. For after the wedding, I booked the Extended Stay Suites on Nasa Road 1 for the second half of the trip. It made no sense to stay 50 miles away in Katy when we were going to spend time in Clear Lake visiting people there. BF didn’t understand this until we started driving around Houston.
When I asked BF about his preference for hotel chains, he just said that since he’d stayed in foxholes with a bunch of guys, it didn’t matter to him. So, I booked our hotels based on location. I just wish that I had done a tad more research into hotels before we went. Next time we will stick with Hampton Inn. But eventually, everything was fine.
A few things went wrong for us. But we made it to the wedding on time and saw Raf and Carmen get married. We enjoyed everything, talked with some great people, and made it home safely. And of course, the food was delicious and beautiful, too.
Friday, November 4th, 2022
Finally, The day came when we drove from the Casa de Rurale to Katy, TX. We began our packing a day or two before leaving. Every day, our pet sitter kindly sent us pictures of the Casa de Rurale Zoo residents.
The day before we left, BF went to someone’s house to install a motor by himself. It had to be done, he said. But it was a bit more difficult than he expected. He hurt his hip somehow and was in pain for a couple of days, walking around carefully. He talked about dancing at the wedding, but thank heavens, he didn’t. I would later find out that he was blathering to make me worry a little. He was successful.
We left home mid-morning and made it to Katy in the early afternoon. The hotel was a little hard to find because I’m not as familiar with Katy as I am with Clear Lake. But after a lovely Mexican lunch, we found it and checked into our hotel room.
Early Voting in Texas
What I didn’t know from looking at Booking.com was that The Katy Hampton Inn was also used as an early voting station. That’s right, it was around the time of the 2022 election, and the hotel lobby was used for early voting. In Clear Lake, that early voting area is the Freeman Library on Diana Lane where I’ve early voted many times. But there was no way to know that the hotel was an early voting station when I booked.
We discovered this when we saw long lines of people trailing out of the lobby door. I went inside to check us in and get our hotel room, while BF began removing our luggage from the truck. Ever the smart alek, BF handed me some of my luggage, and carried the rest, loudly announcing to everyone in the parking lot:
“Hello, My name is James and I’m Amy’s pack mule.”
Yes, he actually said that, out loud, where everyone could hear him. There must have been 200 people standing out there, waiting to vote. He got a few laughs and a few funny looks, but not everyone in line was a Texan, either.
Tex-Mex
One of the things we did was to get a big lunch and takeout boxes so we could eat later. After driving 300-plus miles, we didn’t want to go out again, and the second half was enough for a good dinner. Besides, it was real Mexican food in big Texas style, and worth savoring. (More on that one in the next blog.)
BF’s brother also checked in with the animals in the evening, letting them out again on his way home.
After texting Raphael and letting him know we’d arrived, and BF talking to his brother, we could finally relax in our hotel room. It was lovely and very comfortable, and we looked forward to breakfast downstairs the next morning.
Saturday, November 5th, 2022
Breakfast was great. We had plenty of options and I had some delicious coffee. Because we did need a few small things, we headed to the Katy Target store a few miles up the road on I-10 first thing in the morning. BF wanted a new tie, that sort of thing. Once we got everything, we returned to the hotel to get dressed for the wedding.
Just to let him know what we were doing, I texted Raphael a few times that morning. Additionally, we had the venue and address loaded into the phone so we could find our way without any trouble. We didn’t realize what a long drive it was, and of course, BF was unfamiliar with the terrain.
Rafael told us to leave early since the wedding was scheduled for 3:00. He suggested we leave about 1:30 or so from the hotel. I’m glad we took that advice because we missed the onramp to the Grand Parkway twice. We were not prepared for driving laps on the Katy Freeway. Finally, we got onto the Grand Parkway and headed North.
The Drive
At some point, you get off the Grand Parkway and get onto a road that takes you to The Springs in Magnolia. That road gets smaller and smaller and more rural. It was almost like driving around our little rural area. Then we saw the sign.

We made it!
And then the sign that told us we were at the correct hall:

And in the right place, too.
As I mentioned in my last blog, The Springs of Magnolia is a beautiful rural spot ideal with two reception halls for such an event. Take a look:

Isn’t it gorgeous?
And this:

And the weather was perfect.
This was the chapel-like altar setup behind the hall:

Isn’t that gorgeous?
Another shot of the wedding area:

A closer look at where the wedding took place.
After parking, they directed all the guests around the back of the Stonebridge venue. We sat down, and took a selfie:

We made it!
Then I texted our selfie to Rafael to let him know we were there. I also managed a great picture of BF:

He’s so cute!
Because you don’t see him in a suit every day. I have this one framed on my desk, and why not? BF exudes “FBI Special Agent Fox Mulder” vibes here, too.
My Designer Dress
Because I sew—and I can’t help myself—I had to have a new dress. BF has a few suits, and he just picked one from the closet. But no, I needed a new dress and something stylish. After changing my mind about 187 times (vintage or modern?), I decided on Vogue 1776, a Badgley Mischka cocktail dress from a holiday season or two ago:

Isn’t it fabulous?
I showed it to Rafael, and his first question was, “You’re going to wear white to a wedding?” I forgot to tell him I was making it Navy blue before I showed him the pattern.
And you know I had to have that FRINGE! A quick trip to Etsy and I got some that arrived a week later. I stitched it to the drape and removed it when we got home to wash the dress. The intent was to have snaps to hold the fringe onto the drape, then remove the fringe for washing and storage. But I didn’t get that done on time. (I did the snaps a few weeks ago, as I’ll explain in an upcoming blog post.) It’s fully lined, too.
Unfortunately, I don’t have a good picture of me wearing the dress. . .so, it’s Navy blue, and yes, it does have the long fringe hanging off the drape. And I can’t say it looks just like that on me. Plus, I won’t bore you about how it swings when you walk or how it gets in the way when you’re seated.
The Wedding
Although everybody arrived and was seated on time, the wedding started just after 3:00 pm, maybe 15 minutes or so. But once it did, everything went smoothly. A few of Rafael’s groomsmen were members of the Texas State Guard. They were dressed in uniform for the wedding.

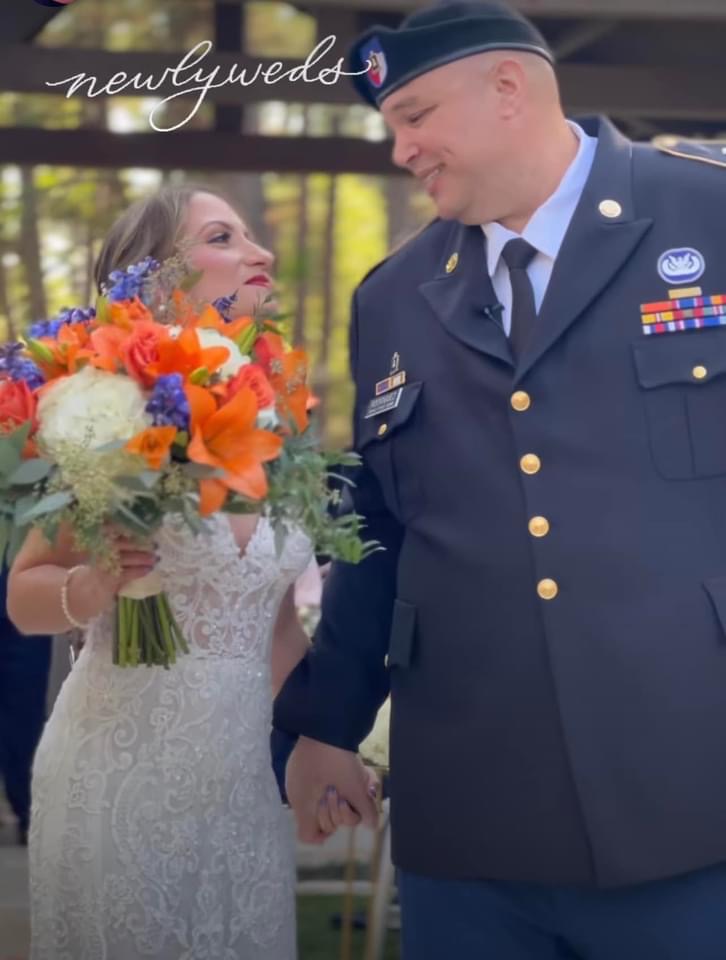
Three are military; Rafael is the big dude on the left.
Then came the bridesmaids, one at a time.

Get a look at that dress!
Isn’t that an interesting color?

There were four ladies:

Same color, slightly different style
I say “interesting” because bridesmaids’ dresses are usually pastel colors, like pink or blue, or darker colors like red, blue, purple, etc. Not here. These ladies were all were drop-dead gorgeous:

Yes, I know, I got the cameraman’s equipment in the shot.
They used this gorgeous and dramatic fall color for the bridesmaids’ dresses and throughout the entire wedding. The flowers all matched, from the bouquet to the cake and table flowers.
Here Comes the Bride!
And then it was Carmen’s turn to walk in her very intricate gown.

Just a few days before the wedding, Carmen’s abuela (grandmother) in Puerto Rico passed away suddenly, and her father had to go back to Puerto Rico to tend to her final arrangements. So, it was up to Carmen’s son to walk her up the aisle. He handled the job perfectly.

Here she is!
We were in aisle seats, so I got some great pictures, even if the official photographer’s equipment was in some of the shots.

I told you he was taller. And Carmen is wearing heels!
Married
The wedding ceremony went off without a hitch—well, none that we noticed. Once the minister pronounced them married, they walked back down the aisle together. Now husband and wife:

The sun came in at the right time, yes?
Raphael was impressed at some of the pictures I showed him, so he asked me for copies. Since they’re uploaded into Shutterfly, I just shared a link to the online album with him. He could easily see and download the entire collection. I think he even used one or two of my shots in his social media.
Then, they posed for a bunch of pictures, naturally! When the pictures were all finished, they went in first. I took this one, which I thought was pretty good:

They look fantastic!
And they both released this one from their official wedding photographer on their social media accounts.

Married! We were literally sitting right there when this was taken.
Then it was time to socialize and have a reception for these two.
Pre-Reception Appetizers
We were led onto the back veranda until they opened the hall an hour later. The workers wouldn’t let us into the hall just yet, so there were appetizers outside in the beautiful cool sunset:

Oh, my word. Ceviche!!!
I didn’t mind. . .except that the sole split from my right shoe as we were walking up the stairs, and my um. . .Spanx was showing a little from the bottom of my dress. Well, it wasn’t our wedding, right? Someone was kind enough to discreetly tell me, but the staff wouldn’t let me inside to fix the Spanx.
BF very kindly went out to the truck to get my other shoes. I wore a pair of Navy Crocs flats with a fancy Badgley Mischka cocktail dress, including the long fringe on the drape. The other option was black duct tape around my shoe. Oh, that’s classic, right? (Classic dork!) I later wished I’d gone with the duct tape, but I’ll explain why later. (I have since found some shoe glue on Amazon, which I’ll add to my next order.)
We met many great people, all friends and family of the now-Mr. & Mrs. Rodriguez, while enjoying some delicious nibbles:

I could have stayed here for the whole reception, but thankfully, we didn’t.
Ceviche And Empanadas
The servers were passing these cups of ceviche, the South American fish dish that is “cooked” with lime juice.

Ceviche! It was SO GOOD!
This picture of the ceviche came out pretty good, yes? It was delicious, and it included a dollop of guacamole. I also plated it to show the details:

Naturally, BF wouldn’t touch the ceviche–too exotic, even if he does like shrimp. He doesn’t know what it is or what to do with it, and lime is involved so that’s a no. That’s just more for me! But he enjoyed the charcuterie nibbles. Servers also passed around these delicious Puerto Rican empanadas, but I only had a beef one.

These were also delicious.
BF had one or two, and he enjoyed them. I kept saying “gracias” each time I was near a server because everything was so tasty.
Yes, I’m afraid “gluten-free” went out the window this time. But like everything we had, it was delicious. I can’t tell you what “Puerto Rican style” meant, but I may ask Rafael one day. When we worked together, I used to tell Raf that if ever I had a Hispanic boyfriend, his mother would be on the hook for Spanish cooking lessons.
Inside The Hall
The staff were putting the finishing touches on everything, I suppose, and getting ready for the delicious dinner meal. We sat with some nice people and had some great conversations. After about an hour of hanging out on the back veranda in the beautiful weather, they directed us to the front door. We were greeted by an enlargement of one of the engagement pictures:

Seating arrangements were posted, and we found our way to our table.

Notice how the design matches the wedding invitation, too.
We signed the little hearts:

And I think there was a book, too.
The tables and arrangements were perfectly arranged, and included the rust color from the dresses and flowers we saw earlier:

Let’s put it this way: nothing was left to chance, and every detail was taken care of to the letter, in the same fashion as Southern Oaks Plantation does.
I knew about the dessert menu in advance, because Raf showed it to me. But the dinner menu was a bit of a surprise:

Interesting, no?
New York Strip Steaks? Yes, thank you! And the addition of chimichurri sauce was nice, too.

Everything was so good.
I also tried the Pollo Tropical, aka “Tropical Chicken.” BF also had the steak because Pollo Tropical was too exotic for him. Besides, there were cute little desserts to sample after dinner.
Longtime readers may remember the day I made my chimichurri sauce after being gifted an oregano plant. Chimichurri normally includes vinegar, so I suggested to BF that he pass on it, which he did. But guess what? It was very delicious and garlicky but with no detectable vinegar taste. They must have omitted the vinegar. I offered to let BF try some, but he declined. He did enjoy the steak and everything else on the menu.
Yes, there was a wedding cake, keep reading. But we also checked out the mini desserts.


Because, why not?
I don’t have a picture of it, unfortunately, (or I can’t find it) but there were also his-and-her specialty cocktails at the bar. The “her” cocktail was a Mango Margarita, and I had to have one. BF was driving, and he doesn’t drink, ever, so me drinking one wasn’t a big deal. (There was also champagne somewhere in there, and I only had one.) Although it was quite a strong cocktail, I didn’t feel it, probably because of the nibbles and dinner. Even if I had become a bit tiddly, we had our phones and Google Maps to get us back to the hotel, and he would be driving anyway.
The Cake!
Of course, because there was a wedding, there was also a beautiful wedding cake.

Lots of lovely details. The flowers and pearl detail are just exquisite:

That’s a lot of work, for sure.
Oops! That’s one detail nobody asked for:


It was a big cake and needed careful handling, so a fingerprint shouldn’t be a surprise, really. Everyone handling or serving food wore gloves. We each had a slice of this delicious vanilla cake with a rich vanilla frosting. Two thumbs up here.
Other Reception Activities
We found our table and were seated with another couple who have known Rafael for many years. During the reception, we met many different people from all over Texas (I think we were the only ones from this side of the Sabine), and for me, it felt like “home.” I’m used to being around lots of different kinds of people, especially after working in the Houston Medical Center, Rice University, Compaq, and Boeing for eight years. (I was the only Boeing alumni who attended, although others were invited.) BF spoke with lots of new people that night and throughout the trip.
Remember when I said everything was perfectly matched? I wasn’t kidding. Even the napkins on the tables were that beautiful rust color.
0
The table settings were just gorgeous, especially with the rust color infusion:

Our table was sort of in the middle of the hall. We were right by the stairwell when the happy couple came down the stairs to join the reception from upstairs.

They were not only happy but enjoying the music that accompanied their descent.
The back of Carmen’s dress was also quite intricate:

I suppose they were taking more pictures up there, but I didn’t ask. And these two were just so happy.
Wedding Pictures of Rafael and Carmen
Of course, the photographers kept Rafael and Carmen busy posing for pictures the whole time. When it’s your wedding, that’s what you do.

They were the only dancers:

I’ll wager a guess that their picture of them with the fog machine looks better than mine:

Family pictures were also nice:

I don’t have any pictures of Carmen tossing her bouquet. If I remember correctly, I stood with the rest of the women for the catch. Normally, I stay far away from that activity. Well, I didn’t, but I wasn’t looking to catch it anyway. Maybe they decided who would catch it, and that’s OK, too.
I managed to get a quick selfie with Rafael:

My Boeing Brother.
Didn’t get to talk to him for very long. Then again, nobody else did, either. And guess who forgot to say Hi to Rafael’s parents? I know, DUH. But it was a busy night for them, too.
Reception Amenities
Everyone received one of these cute little favors, best described as a coaster, or maybe a Christmas tree ornament if you leave it in the little bag:

Either way, it’s a pretty reminder, and BF and I both brought one home. They’re nice keepsakes for some great memories. We’ll enjoy them for many years to come, along with the next souvenir.
The Sketch Artists
We noticed people were gathered around two sides of the hall, one in the front, and one in the back. After dinner, we investigated. It seems that the happy couple brought in a pair of sketch artists to make drawings for attendees.

These ladies were SO BUSY!
Wasn’t that nice?
I think they did Rafael and Carmen’s first, then sketched others as they approached the tables. We really didn’t know about this ahead of time. Both ladies worked hard to get everyone’s beautiful sketches done. We waited until they got less busy so they could catch up a little, and this is what she gave us:

Ours was also nice, and I did see Doctor Who and his Companion vibes here. Maybe that’s just me.
Of course, the sketch captured my dorky flats with a designer cocktail dress. Now you see why I wish I’d gone with the black duct tape instead. It’s not a big deal, but again, it was their wedding. Later, I framed this little sketch, and it’s hanging where we see it every day.
Photo Booth With Video
I don’t know how to describe the second amenity on the other side of the hall. It’s a photo-booth thing where you can take still pictures and make a 30-second music video in front of a 360-degree circulating camera. We went with the pictures, but not the videos, and this is what came out:

I know, I look awful here. The dress was too big because I didn’t get to fit it correctly before we left. Bright lights, no filters, and other reasons, but lots of photogenic props for posing. BF had to lean on me a little because he was still hurting from Thursday’s motor installation. This was my one chance to wear a tiara, so I did. BF just had fun with the “wedding crashers” sign, the prop gun, and looking “gangsta.”
If you’re reading this and laughing about it now, you should be. I may try to use some photo editing apps to make a nicely framed headshot of us from one of the pictures.
We could have walked to the next “attraction” with the tiara and pea shooter in the middle of the stage and made a 30-second dance video with flashing lights and the camera racing around 360 degrees. Honestly, we had to ask about what the heck it was so we could decline! It’s hard to describe, and I don’t even know where to find something online to show it to you. Everyone was having fun making their videos, and BF was still in pain, so we just watched.
Eventually, I want to add all our pictures into a few of those little books from Shutterfly.
The Texas Military Delegation
I’ve told BF before that Texas has its own military, to which he would respond, “Oh, you mean the National Guard.” You see, he was in the Louisiana National Guard for a long time with a couple of active duty stints overseas. As a veteran, BF knows all about that sort of thing.
Except in Texas.

Louisiana has a National Guard delegation, but not a formal “state militia” as Texas does. That’s because Texas was an independent country before it became a state. BF didn’t understand, and I don’t know enough about it to give him a proper explanation.
Rafael joined the Texas Army several years ago and continues to do technology-related work for them. During the reception, we approached a couple of these Texas Military members, introduced ourselves, and asked them to explain it to BF. They were happy to talk about it, and BF learned some interesting things he didn’t know. Military guys are in their zone when they start talking about their service tenures! I was glad to see him chatting with these fellow veterans, and he learned a lot he didn’t know before.
Enlightenment
On the return drive to the Katy Hampton Inn, BF called his brother. The first words out of his mouth: “Did you know that Texas has its own Army?” I just smiled while he explained everything to his brother.
The next morning, we also had breakfast with one of the groomsmen, also a Texas Military man. We didn’t know he was staying in the same hotel. He was going home to Austin while we were headed to the Extended Stay in Clear Lake for a couple of days. When BF told me who it was, I took a picture and sent it to Raf, who got a kick out of that one. We had a nice conversation over breakfast and coffee with him, including a little more about Texas’ military forces before parting company.
The Remains of the Night
After we got our portrait drawn by one of the two sketch artists and had a small bit of the wedding cake, we left the reception.

The remains of the day, or night
We were there until about 9:00 pm, I think.
Before we left, we saw Rafael again, congratulated and hugged him and Carmen, and walked out to the truck to head back to the hotel in Katy.
It was a lovely wedding that evening with delicious Puerto Rican-style food and a great time with a diverse group of friendly people. The weather, the venue, and everything else was just perfect. The Mango Margarita added a little tasty je ne sais quoi, but not too much.
Congratulations to Rafael and Carmen, and Happy Anniversary. We hope we’ll get to see them again one day soon.
What’s Next In HeatCageKitchen
I’ll try to get these done sooner rather than later, but now that the wedding blog is done, it should be easier.
The rest of the trip to Houston
The next blog will include the rest of our Houston trip, including a visit to the Houston IKEA store. We also visited some people: Aunt Ruth, Aunt Kathy, and Neighbor E. I’ll also tell you what went kind of sideways. That will be a blog of its own.
Thanksgiving
Miss Alice and her daughter N came for Thanksgiving last week. That was a busy couple of days! We were so glad to see them, but a couple of obstacles that meant I wasn’t entirely ready when they got here. But Buddy was so happy to see his friend B-Dog, who is ten years older. I got a few pictures, but not many, because I was so involved in getting a turkey in the oven and dinner on the table. Whew!
Another wedding
Guess what? We went to another wedding, a year after Rafael’s. This one was closer to home, in the Knights of Columbus Hall in nearby Ponchatoula, LA, and one of BF’s business cohorts. It was also nice, in a smaller venue, and every bit as enjoyable. Admittedly, I wore the dress from Rafael’s wedding with a few tweaks, including the removable fringe. That wedding will be a separate blog, too.
The Holiday Season is here whether we want it or not, so buckle up and stay warm. Winter is starting to show itself, and we hope we’re ready if we have another big winter freeze before spring.
Until next time, Happy Dining!


