
A Tale Of Cheesecake
Cheesecake–the word conjures up images and tastes of sweet and creamy, and with good reason.
Hello, again, Dear Readers:
As promised (and way too late), here is my blog on cheesecake. Today’s post comes with two separate recipes from two different books, one of which was a gift from Callisto Press.
I don’t remember the first time I had cheesecake, but it was probably one of those frozen numbers. However, I remember being in a restaurant somewhere in New Orleans in the late 80’s and ordering blueberry cheesecake for dessert. Luckily, I got the last slice they had. That didn’t go over well with my dining companions, but today I couldn’t tell you who they were.
Contents
- Learning Cheesecake
- Cheesecake #1: Keto In The Instant Pot
- Into And Out Of The Instant Pot
- Cheesecake #2: Even Easier
- Swerve Or Erythritol?
- Making The Filling
- Secret Weapon: Liquid Stevia
- Filling And Freezing
- The Faster Cheesecake
- Other Cheesecake Notes
- Conclusion: Cheesecake Is Delicious
- Cheesecake, Slow Cooker Style
- The “Keto House”
Table of Contents
- Learning Cheesecake
- Cheesecake #1: Keto In The Instant Pot
- Into And Out Of The Instant Pot
- Cheesecake #2: Even Easier
- Swerve Or Erythritol?
- Making The Filling
- Secret Weapon: Liquid Stevia
- Filling And Freezing
- The Faster Cheesecake
- Other Cheesecake Notes
- Conclusion: Cheesecake Is Delicious
- Cheesecake, Slow Cooker Style
- The "Keto House"
Learning Cheesecake
I’ve bought many of them until I learned how to make them from Suzanne Somers’ cookbooks. From her first book, Eat Great, Lose Weight, I started making the Sugarless Cheesecake on page 186, but with Somersweet when it became available. The original recipe called for Nutrasweet, which I would never use. Later, she discovered that Nutrasweet wasn’t the best option and eliminated it from subsequent books.
From Get Skinny On Fabulous Food, I also like the Cappuccino Chocolate Chunk Cheesecake, which involves some sugar, so it’s “Level Two.” This means you’re incorporating some carbohydrates into your eating plan. I always made it with Somersweet. But with the wide availability of sugar-free chocolate and chocolate chips, I might revisit this recipe and try it again with erythritol (Swerve.)
In her Sexy Forever Recipe Bible, which is partly a “best of” compendium book but with other new recipes, there are three cheesecake recipes. On page 343, the New York Style Cheesecake is from one of her smaller books, Desserts. The next one is called Cappuccino Cheesecake on page 345, and is similar to the Cappuccino Chocolate Chunk Cheesecake. All of these recipes used Somersweet. I’ve never made it, but on page 344, there is also Peppermint Cheesecake With Chocolate Crust from another book.
There may have been one or two others here and there, but until recently, Suzanne Somers’ recipes have been the standards by which I make cheesecake.
Today I offer two more delicious offerings that are also healthier options.
Cheesecake #1: Keto In The Instant Pot
I’ve mentioned the multiple keto cookbooks I’ve been gifted, but there is one that I bought: Keto In An Instant by Jen Fisch.

Newest book by Jen Fisch.
Last year I reviewed her book Keto In 30 Minutes. I later got her first book, The Easy 5-Ingredient Ketogenic Diet Cookbook: Low-Carb, High-Fat Recipes for Busy People on the Keto Diet while on a Target run. She has one more book that I plan to get soon.
After her 30-Minute book, I subscribed to Jen’s emails and found out about the upcoming IP book, and later pre-ordered it. Jen promised, and this book delivers with some tasty food, some of which BF likes.

This is one particular recipe he likes, minus the okra.
One particular delight, of course, is her Vanilla Bean Cheesecake on page 197.
Because it’s an Instant Pot, you’ll need a six-inch springform pan. Naturally, I happen to have one, bought about 1996 or 1997 to make a no-bake cheesecake for “company” from a Martha Stewart magazine dinner. (I was a newlywed at the time.) Used once, I’ve dusted it a few times, so I was glad to find a reason to use it.
The crust is made from almond flour, a tablespoon of erythritol, and two tablespoons of melted butter. Jen’s trick to ensure a nice crust is to encase the bottom in foil that’s lined with a paper towel. Press the crust down in the bottom of the pan, just as you would with graham cracker crumbs.

A simple nut crust underneath
I don’t have any pictures of what comes next, so I’ll have to tell you: mix up 12 ounces of softened cream cheese, the insides of a vanilla bean (or a little more than a teaspoon of vanilla extract), 3 large eggs, a quarter-cup of heavy cream, a teaspoon of grated lemon zest, and two teaspoons of fresh lemon juice with your electric mixer (a hand mixer will work.) Then pour this over the crust.
Into And Out Of The Instant Pot
Ok, as with most pressure-cooker recipes, you’ll need to add a cup of water into the pot. Add the trivet with the lifting handles, then carefully put the pan on top of the trivet in the pan. Cover the top of the springform pan with foil.
Put the lid on and secure it, then set it to cook on high pressure for 45 minutes. When the 45 minutes is done, let it depressurize on its own for 15 minutes, then quick release to pop the pressure completely. Now you can remove the lid.
You’ll first remove the pan with the trivet from the pot–be careful, it’s hot–and remove the foil and paper towel from the bottom. Let it sit out for an hour to cool, on a wire rack. After an hour, cover the pan with foil and put it in the fridge for anywhere from 4 to 24 hours.

Obviously I didn’t follow the directions exactly.
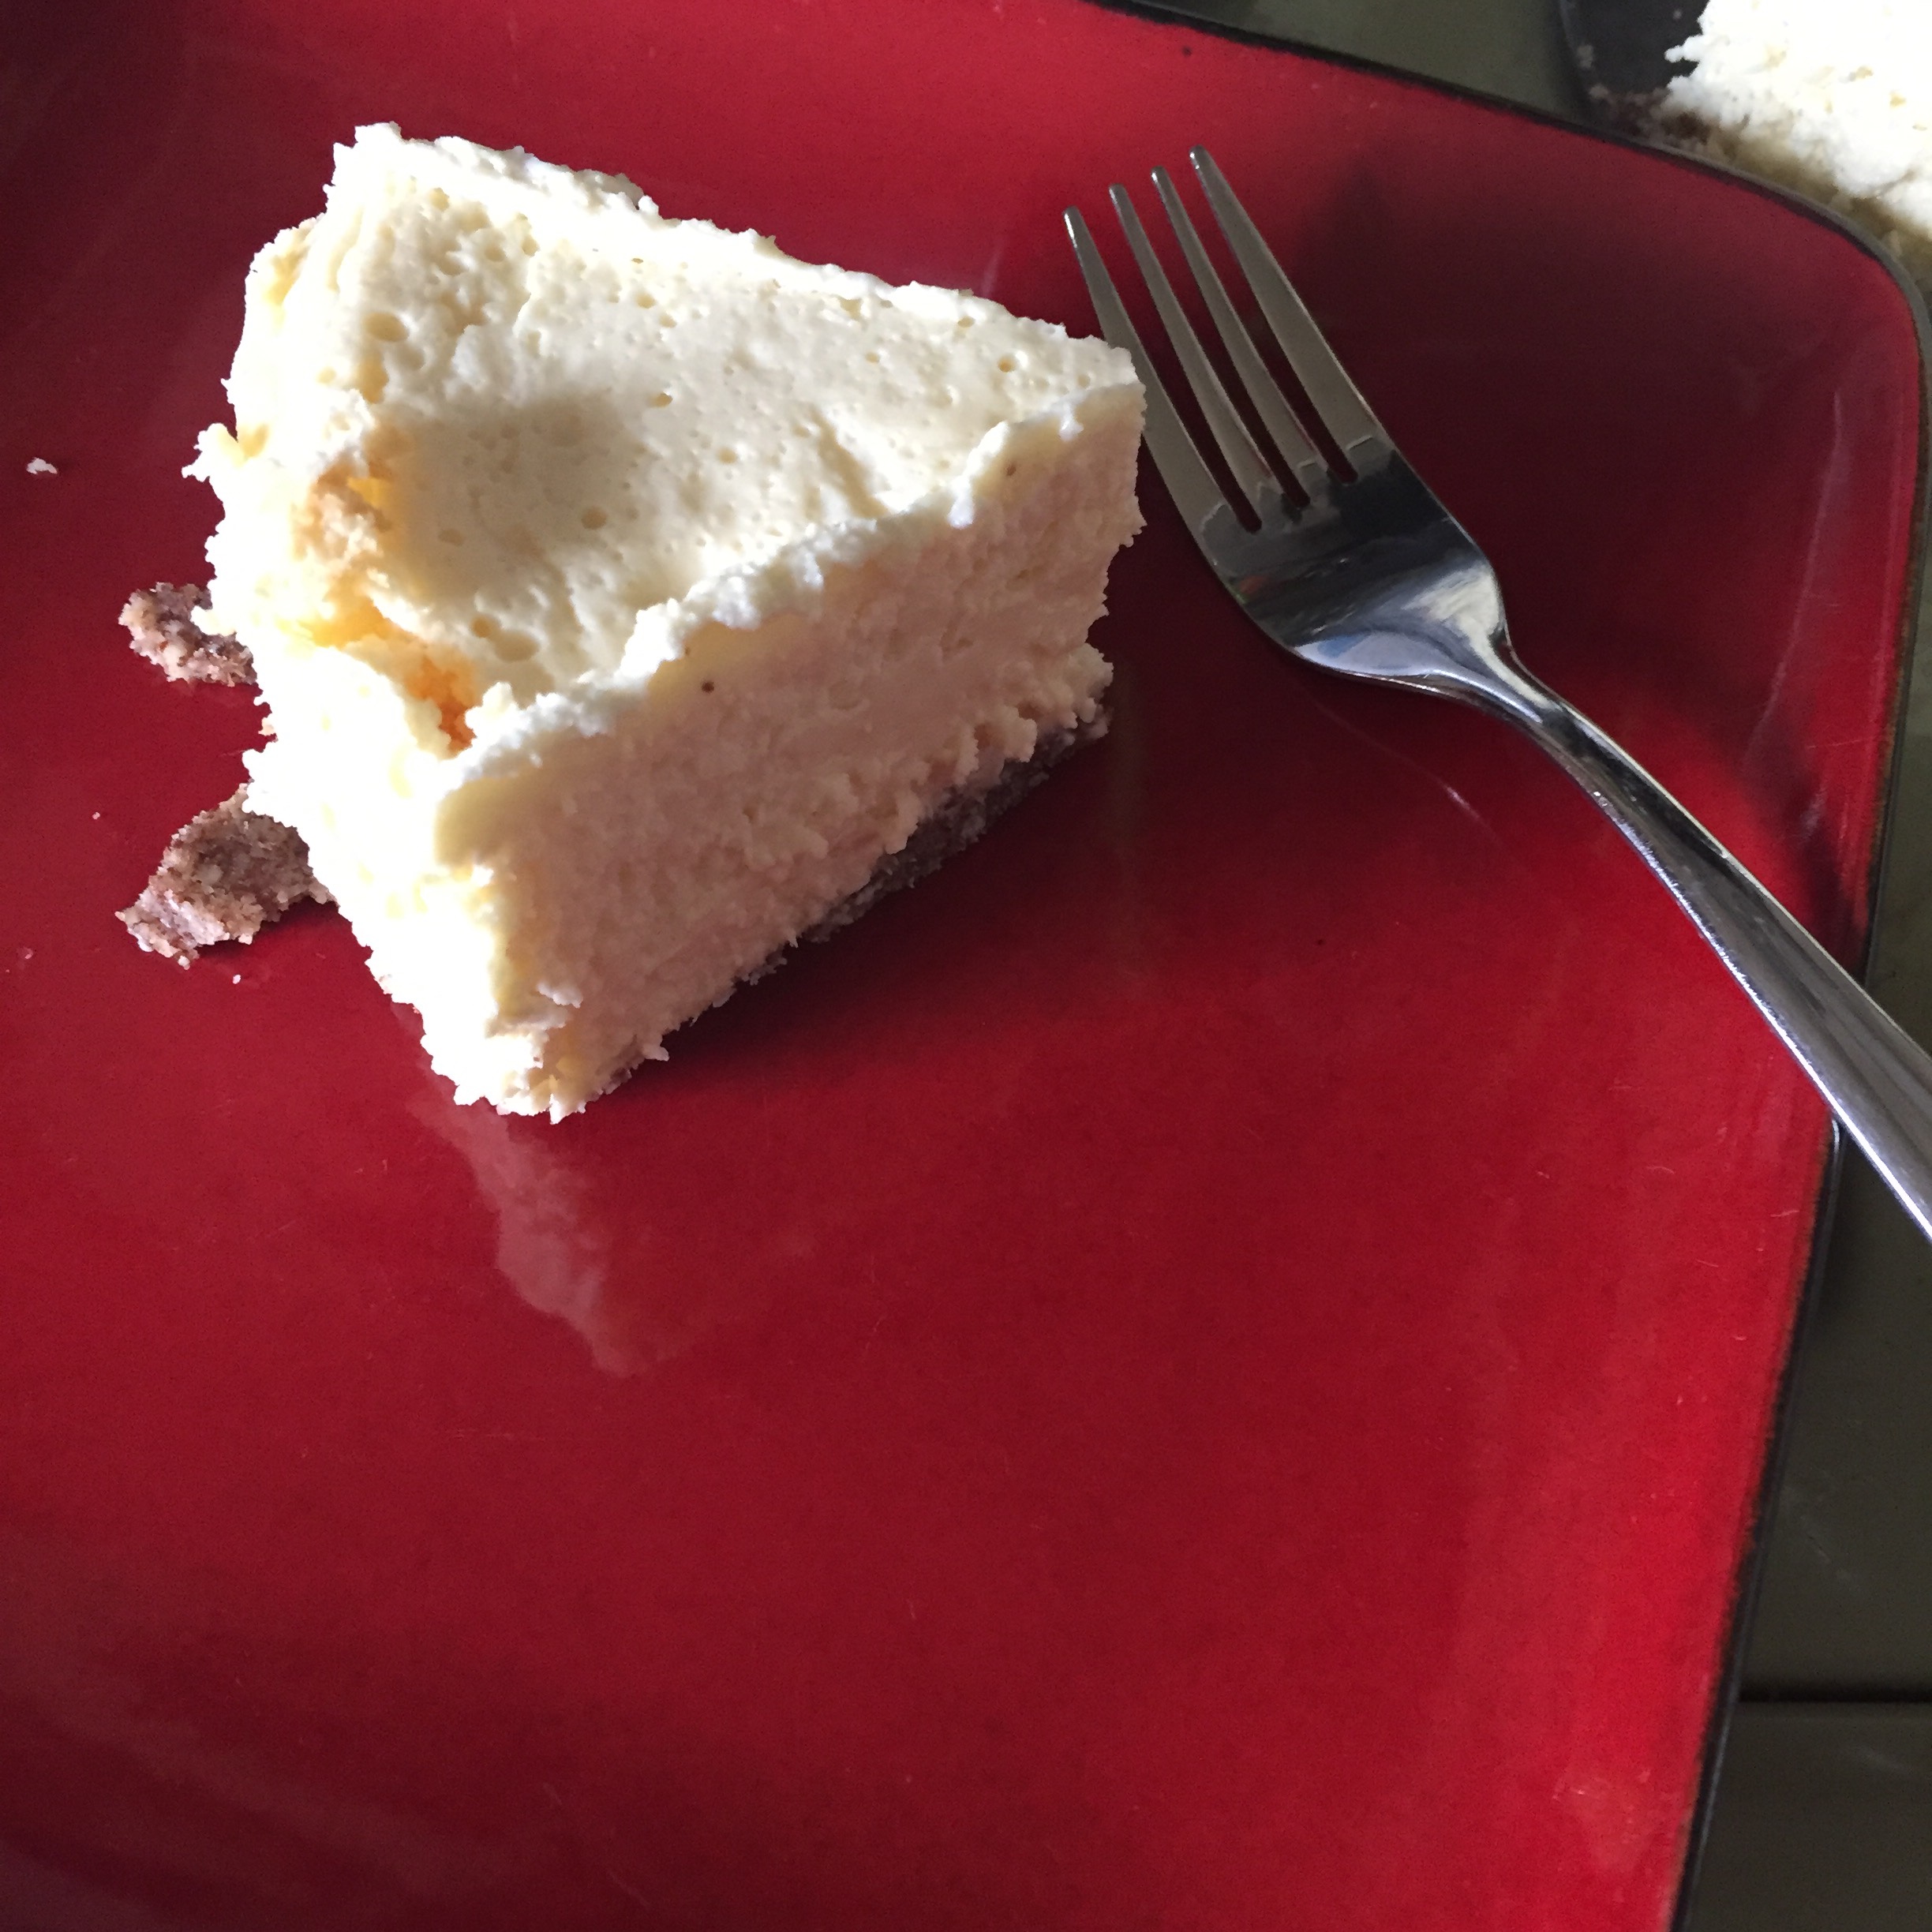
Yes, I know, sometimes I don’t do it exactly right or I don’t read the directions correctly. It happens. At this stage, it’s light and fluffy, but it hadn’t been refrigerated. Once it’s refrigerated, it’s a little flatter, more solid, and more like a cheesecake, as in this picture.

Doesn’t that look delish?
There is never a bad time to have a delicious cheesecake, especially if it’s a healthier version:

And what’s wrong with having cheesecake with breakfast, or egg & cheese chaffles for dinner?
If you’re just wild about the Instant Pot, as BF’s sister and sister-in-law are, this is a great dessert anytime. Remember, it’s only a six-inch diameter, and you’ll need that size of a springform pan if you don’t have one already. They’re not expensive, and that’s the perfect size for the Instant Pot. Plus you’ll have to plan ahead.
But that’s not the only way to do this.
Cheesecake #2: Even Easier
Ok, so now you know how to make a delicious, low-carb/keto/sugarless/gluten-free cheesecake in your Instant Pot.
What if you don’t have an Instant Pot, or don’t want to mess with yours? Ladies and gentlemen, I have yet another solution: The Everyday Vanilla Cheesecake from The 30-Minute Low-Carb Cookbook by Pamela Ellgen. It’s on page 126, and I’ve been making it since December 16th of 2019. How do I know? Because whenever I got the book, in October, I think. I flipped through it and kept thinking I needed to try this out. Finally, I did, loved it, dated the recipe, and I’ve been making it ever since.
Literally. When I make one, I seek out the ingredients for the next one. That is, I get more cream cheese, and check my supplies of almond flour, cream, lemon, and butter.
What’s so great about this cheesecake when you’ve got Jen Fisch’s deliciousness? Well, for the following reasons:
- There is little baking/cooking–the crust is baked for a short time, but the filling isn’t
- No eggs are involved, good for people like The E Man, who is allergic to eggs
- You can eat a slice of cheesecake in an hour
- It’s two inches bigger than Jen’s
Not that Jen’s cheesecake isn’t worth it, because it is. But even Jen may like this one, even though it’s not hers. (I don’t know, I haven’t asked. Just an opinion.)

The Setup
This version happens in two parts, essentially. Unlike Jen’s Instant Pot cheesecake, you’ll make the crust first, bake it, then mix up the filling. But before we get started I need to tell you about the sweet part.
Swerve Or Erythritol?
Like most of the newer low-carb and keto dessert recipes, they tend to call for Swerve brand sweetener, which I wrote about a while back. It’s a great replacement for the extinct Somersweet, and it works just like they say it will, cup-for-cup.
However, erythritol is available in a number of forms, and from a number of places, including Whole Foods, Amazon, and Vitacost, which has a 3-pound bag for $13.99. From what I’ve seen, that’s not bad. Vitacost also sells other brands, as well as Swerve for about the same price as other stores, including Walmart.
Should you decide to pass on Swerve and buy plain erythritol, you may find that it’s like regular granulated sugar. It doesn’t dissolve or “melt” like regular sugar would, so you have to grind it yourself. It doesn’t take much to do, just drop it in the food processor until you get the consistency you need.
Remember my little blender/food processor combo?

It’s perfect for this task, because then I empty out the powdered erythritol and blend up the crust. It works like this–first I grind up the sweetener:

I drop all that I need for the entire recipe in and grind all at once.
I dump the whole thing into a pinch bowl:

These little bowls are very handy for setting out ingredients anytime.
And then get on with the crust, starting with the half-stick of melted butter:

Butter binds the almond flour to make a nice crust for your cheesecake.
I pour it into the food processor first:

There is a bit of residue from the erythritol, that’s OK
Then add two cups of almond flour:

Right on top of the butter
A small bit of salt:

Just a tiny bit for contrast, no need for salty/sweet
Then add the two tablespoons of sweetener:

Goes right on top
Now blend it up:

This little food processor function is great.
It takes a couple of minutes for the whole thing to mix up perfectly. It took longer if I put the butter in after the almond flour.

Looks like this.
Once it’s well blended, add it to your ungreased, unlined springform pan.

Just like that. It’s the consistency of cookie dough.
You’ll need to press it into the pan. A trick I learned on The Food Network was to use the bottom of your measuring cup. It’s fast and easy as well as a lot more even. If you have arthritis, you’ll likely prefer that too.
It doesn’t take long, and once you get the hang of it, you’re done.

Works great, doesn’t it?
Now in the process, you’ll see some of the crust move up the sides. I like to take that off so that it doesn’t break off and make a mess when the cheesecake is done.

A butter knife would work well, too.
When you’re done, it’s nice and neat.

see?
Bake it at 350F for about 8 minutes:

Perfect!
When it’s done, you’ll have a lovely crust.

Doesn’t take long at all.
When the time is up, put it in the freezer. In my case, I put a cork trivet underneath to keep it from melting the ice trays. Our kitchen fridge and freezer don’t have a lot of room.
Be careful not to grab the clamp–I did that once. Fortunately, nothing bad happened, even though the pan was very hot.
Now time to get on with your filling.
Making The Filling
I start this while the crust is baking, and in the middle, I have to stash the crust in the freezer.
Your sweetener is already measured, so now just squeeze out your lemons and measure out the heavy whipping cream:

Just a half-cup.
Add your ingredients to the bowl, starting with your room-temp cream cheese:

They’re really soft, so they fall right out of the foil packets
Add in your previously ground sweetener, one-third cup:

It looks just like sugar!
Then the cream:
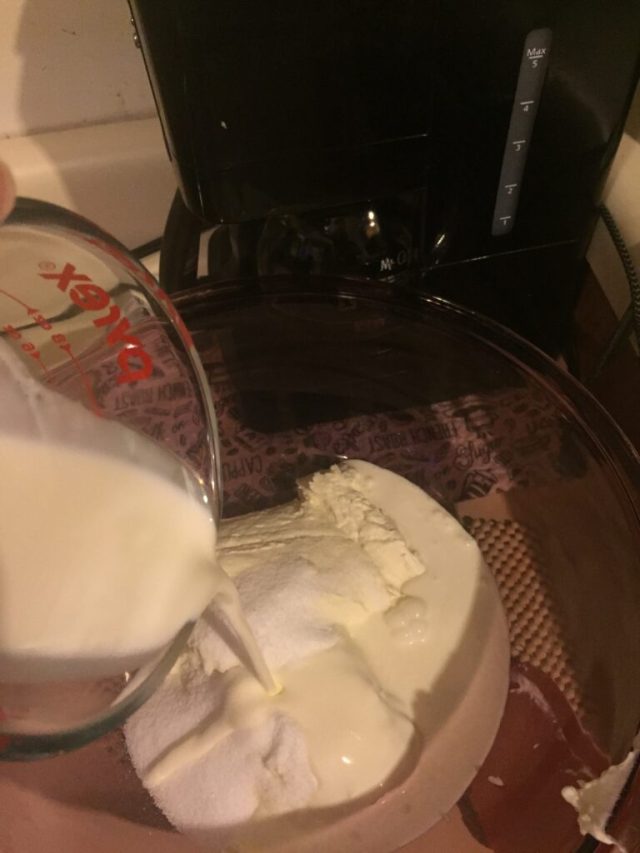
Then the lemon juice and vanilla:

I found my favorite Mexican Vanilla in Hammond, of all places. Must get more soon.
Now start mixing:

It starts out like this, but gets very smooth in a few minutes.
You’ll know when it’s ready:

Just like that.
Take a taste and see if you like it.
Secret Weapon: Liquid Stevia
Ok, if you feel like the filling isn’t quite sweet enough, here’s what you add to the filling, one drop at a time:

Any brand of stevia will do. Add drop by drop, it’s powerful!
I put about six drops in and blend it along with the erythritol. It doesn’t change the taste, and makes it a tad sweeter, but not overly sweet. If you want more, add a little more–but one drop at a time, or you’ll ruin the cheesecake.
And if you’re alone in your kitchen, you get a special treat at this point.

Yum!
At this point the crust may still be hot, so you might leave the filling off to the side and do a little cleanup, maybe fill up the dishwasher or set some things aside to soak. Doing so will give the crust a little more time to cool off.
Filling And Freezing
Ready? Carefully pour and/or scoop the filling into the not-so-hot-now crust:

Really easy to do
Use a spatula or other tool to smooth out the top:

It will freeze like that, so it’s important.
Back into the freezer:

Almost ready
The book says 15 minutes in the freezer to “firm up,” or an hour in the fridge. Your choice. I usually leave it for more than an hour, but of course, it’s hard as a rock.
BF had to repair this hinge for me because one day I pulled out the rivets with a frozen cheesecake:

Yes, I broke it, and he fixed it.
But generally, it pops right out:

It usually just separates when the pan expands.
The Faster Cheesecake
This is what you end up with:

Isn’t it lovely? All nice and neat!
Because I consume this cheesecake a sliver at a time, I cut it in quarters first:

Mine is a bit frozen, so it’s a little difficult

Makes it easier
And then with a smaller knife, I cut a slice out:

Ta-dah!!
It really is that easy and that good. You could eat the whole cheesecake if you wanted to (even I can’t do that) but it’s very rich and delicious, so you don’t need much.
BF said he had a small bit of it when I wasn’t looking, and he agrees that it’s quite delicious. I’ve served a bit to one of his car-guy friends who has been here for dinner several times (because he was here at the right time.) He was quite impressed because I did warn him it was gluten-free and sugar-free.
Other Cheesecake Notes
The first thing I should mention is that in order to make the cheesecake quickly and make sure the filling comes out smooth is to leave the cream cheese out for a good long while.
My suggestion is a minimum of four hours. But if you’re making a cheesecake after work, just take it out of the fridge and leave it on the stove in the morning and get to it when you’re ready. If you want to make it first thing in the morning and have it at dinner that night, take leave the cream cheese out all night.
Make sure that if you have critters, they can’t reach the cream cheese packets. Never mind how I know that. You probably don’t need to leave it out for two days as I do sometimes. Unintentionally.
Use ONLY fresh lemon juice for this, or lime, as I’ve done a few times. If you use lemon extract, you will regret it. Immediately. Nevermind how I know this.
Conclusion: Cheesecake Is Delicious
I’ve added both of these to the Recipes page, as well as the recipe for El Chico’s Chorizo, which I intended to add at the time of the post and apparently forgot.
I also took the opportunity to do a bit of updating on the recipes page, and it’s a little easier to find things now.
If you really like cheesecake, there is no end to the recipes you can find online. Check Pinterest, AllRecipes, do a Google search, or any website you prefer, recipes are available with a few clicks. Whether you want gluten-free, low-carb, dairy-free, or you want the best cheesecake there is, go looking for it, you’ll find it. (I just can’t vouch for them all!)
Cheesecake, Slow Cooker Style
Remember my slow cooker post a few years ago when I made a low-carb chocolate custard? Slow cooking expert Stephanie O’Dea has two recipes on her website for cheesecake, one standard type, and one for pumpkin cheesecake. Both can be made anytime–canned pumpkin is available year-round in the grocery store, likely on the bottom shelf.
Stephanie’s aren’t keto, but if keto isn’t your thing, that’s OK too. I’m thinking maybe a pumpkin cheesecake if we meet up with BF’s family at his Dad’s place up the road. I brought what he calls the waffled “Awful Falafel” to Thanksgiving last year and loved watching him cringe when his sister, brother-in-law and sister-in-law enjoyed it. That’s what he gets for yakking to his friend in San Diego about my “horrible” cooking. I’m sure a pumpkin cheesecake might be a welcome addition this year, too.
The “Keto House”
On a related note, Jen Fisch’s first book was highly successful and allowed her to buy and renovate a house in Arizona. It’s now available to rent on AirBnB and Homeaway, a beautiful desert oasis that makes me want to plan a trip with BF sometime. It’s big, so we could go with several people, but maybe I just want to go with him, too.
That’s a ways off right now, but darnit, it’s a goal!
That’s all for now. More tasty food coming.
Happy Dining!
Comments are closed